Azure DNS
Create the record in Microsoft Azure DNS.
Separate download
This plugin is offered as a separate download, which can be downloaded from the
releases page on GitHub has to
be unpacked into the folder where you also unpacked wacs.exe to able to use them.
If you are using win-acme as a dotnet tool, you will have to unpack to
%userprofile%\.dotnet\tools\.store\win-acme\{version}\win-acme\{version}\tools\net5.0\any
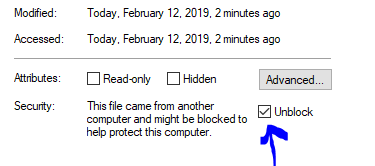
Note that after unpacking you may have to unblock all new .dll files before .NET
will trust them. You can do that from the Windows File Explorer by using the right
mouse button and then checking the Unblock box on the General tab.
Using a downloaded plugin
To verify that the plugin is properly installed you can start the main executable
with --verbose and it will print information about found and loaded plugins at
start up. When the plugin is loaded, it manifests itself as extra menu choices and
command line parameters being made availalbe.
Requires pluggable release
This plugin requires to you use the pluggable release of the main executable. It
will not work on the smaller trimmed releases.
Setup
This assumes you already have your DNS managed in Azure; if not, you’ll need to set that up first. If you are using the Azure DNS option for validation, you’ll need to get certain info from your Azure Tenant, and create a service principal for win-acme to use (you’ll only need to create on of these - it’s basically an account that has authority to create DNS records). There are two ways to authenticate with Azure:
Create Azure AD Service Principal Account
Use the Azure CLI to create an Azure service principal
You then need to give this Service Principal access to change DNS entries. In the Azure Portal:
- Go to
DNS Zones>sub.example.com>Access Control (IAM) - Click
Add - For Role, choose
DNS Zone Contributor - Assign access to
Azure AD user, group, or application - Select your Service Principal
- Click
Save
Use a Managed Service Identity
More information here. Note that configuration can be different depending on your operating system version, e.g. #1413.
Configuring the plugin
During setup of the validation the program will ask several questions. Here is to answer them with information from the Azure Portal.
DNS Subscription ID: DNS Zones >sub.example.com>Subscription IDDNS Resource Group Name: DNS zones >sub.example.com>Resource Group)
Only when authenticating Service Principal Account:
Directory/tenant id: Azure Active Directory > Properties >Directory ID.Application client id: Azure Active Directory > App registrations > [Service Principal] >Application ID.Application client secret: The password that was generated when you created the Service Principal Account.
Resources
Unattended
Service Principal Account
--validation azure --azuretenantid xxx --azureclientid xxx --azuresecret ***** --azuresubscriptionid xxx --azureresourcegroupname xxx [--azurehostedzone xxx]
Managaged Resource Identity
--validation azure --azureusemsi --azuresubscriptionid xxx --azureresourcegroupname xxx [--azurehostedzone xxx]